Kentucky has made it to the Sweet Sixteen! Hooray!! They play tonight for the Elite 8- GO CATS!
SO......While trying to break up the monotony of making little cosmetic bags and clutches (all that I am practicing my sewing on), I decided to try my hand at a fabric headband!
My best friend owns 2 or 3 of these, and I thought they would be a cute change to the hair clip, bobby pin, or regular headband. You can buy them OR you can make them :)
Now, this is the first headband I've ever made, so it's not perfect.....
But I'll give you the basics..........
Supplies
Cute Fabric
Scissors/fabric cutter
Cutting mat
Ruler
Sewing machine
Elastic hair band (you'll need 1/2 of it)
1. Cut your fabric 13" lengthwise and with a 4" width
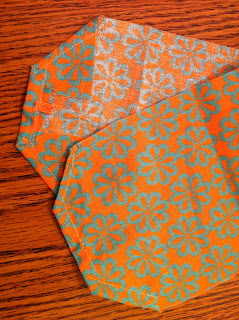
2. Sew the ends first. Fold the end corners of your fabric into triangles 2" up leaving a 1" gap in between. Then, fold up the center 1/2" and sew (see picture).
3. Fold the fabric in half with the right sides facing each other. Sew on the outer edge with a 1/2" inseam. Trim the edges.
4. Turn the now "tube" inside out and place the seam in the middle. (You can lightly press with iron if you want- I didn't).
5. Cut the hair band perfectly in half. Taking one side, sew the elastic onto the fabric end (do one end at a time) about 1/2" into the hole. (Try not to sew all the way across the fabric, you just want to secure the elastic to the fabric - did that make any sense?) Repeat on the other side making sure it's not twisted.
6. Finally, while still working at the underside of the headband, fold the corners up around the elastic
and sew (they should make a triangle again) to completely enclose the elastic.
7. It's ready to wear!!
* Apologies for the VERY orange looking photos and the quality since they're from my phone!!! Sorry!
The fabric is really a light peach with aqua flowers.
* Thanks for bearing with me on my first sewing tutorial! I'm not sure I know the exact lingo :)
Linking this to:


ps- And a very Happy Birthday to my sister (in law) Lauren!!!!
 |
| Happy 24th! Love you! |


